I know I said in my last review entry that I would create a new database. I decided to save that for next time. Instead, I thought I would do a quick run through of the screens used to manage databases. That is, the screens used to create tables, create and edit fields, set relationships, etc.
As I have come to expect from FileMaker, the tools used to manage databases are very visual. So far, the visual aspect of FileMaker has been its strongest feature, for me anyway.
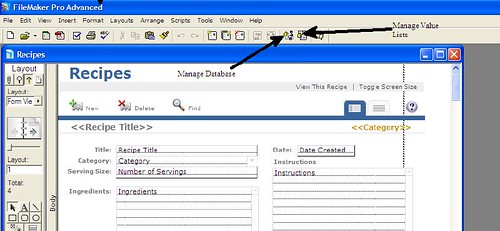
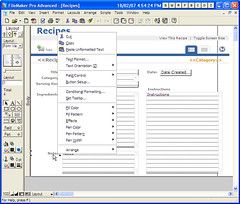
In the photo above, you can see where I have arrows to two buttons on the tool bar. The button to the left is the "Manage Database" button. The button to the right is the "Manage Value Lists" button. I will explain both of those below.
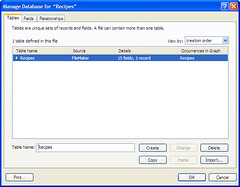 When you press the "Manage Database" button, you are taken to the Tables tab. On this tab, you will see all table definitions contained within this file.
Remember the last entry when I created the Recipe database, I saved a single file. In FileMaker, you may have a database file with 1 or more tables. The recipe data is simple enough that only a single table was required. A future application in the series will create a database with multiple tables.
On this screen, in addition to seeing what tables are contained within the file, you can see how many records are stored in the table and how many fields comprise the table.
 The next tab is the fields tab. The fields tab is where you would add, drop or edit a table column. You give a column a name and a data type. You can optionally give it a comment.
The Options button allows you to set additional processing information about the field. Some of the options are Defaults, Calculated Values, Lookup Values, Validation, Editability, Storage, Indexing and even a Japanese translation. I will also cover this field in greater detail in a future review entry.
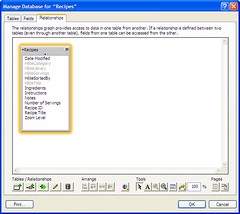 The final tab is the relationships tab. There's not much to say about this database because there is only a single table. In a more complex structure, you may link fields in one table to fields in another table. This is called a foreign key and/or referential integrity.
In FileMaker, you may link many tables in a single file, or you may link tables across files. As a matter of a fact, you can create a relationship to a table using an ODBC connection which means you can link to external databases from other vendors. That is a topic I will definitely be covering in the future.
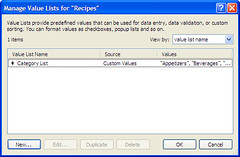 The other button I highlighted above, is the "Manage Value Lists" button. The recipe database has a field called category that is pre-populated with a list of values. You use the "Manage Value Lists" to edit the values in that list.
From this window, you can select the value list of interest and press the Edit button. Of course, you can also create and delete lists here.
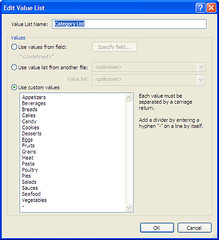 For your value list, you can either use values stored in a field in this database, in another database or with hard coded values.
Very frequently you will want to use a table as a lookup value. In a system, you will want to share that data across multiple databases. In my next entry, I will create a new database and store the Category lookup value as records in a table. I will then come back and modify the Recipes database to use that database and table.
LewisC
filemaker review
Saturday, October 06, 2007
FileMaker Pro 9 Advanced: Managing Databases

Tuesday, October 02, 2007
FileMaker Pro 9 Advanced: Create and Use a Seed Database
Note: Click on any picture to view a larger version of it.
 I decided to start off with baby steps. I'm going to create a database using on of the seed definitions. FileMaker comes with a decent selection for most home and small business users. Because I am a cooking affcianado, I decided to use the Recipe seed database.
After selecting the database type, you will get a "file create" dialog. Using this dialog you can put your database wherever you like. This is different from Oracle, PostgreSQL or MySQL where you have a specific data directory(ies).
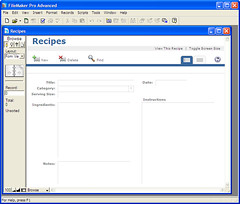 When using a seed database, FileMaker generates several views for you automatically. You get a form view (for viewing and editing), a list view and a report. The form view comes up automatically after you create the database.
The form has fields on the screen that correspond to columns in your database. The Recipe database is pre-seeded with data so that Category column is already populated with recipe types. If you were building your own database, you would need to populate lists like this.
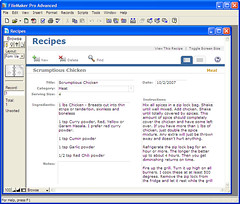 Being a glutton, and a cook to boot, I enter my own Lite and Spicy Chicken recipe.
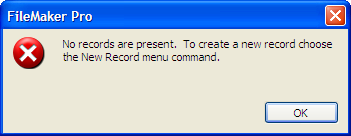
Before choosing New from the toolbar, I tried to start typing and got the error below. That's not a bad thing. The message told me what I did wrong and what I needed to do to correct it. How many times have you tried to do something using a particular piece of software and the error message made absolutely no sense. Two thumbs up.
 After entering my recipe, I clicked on the "View This Report" link on the upper toolbar. FileMaker as me if I wanted to save my record. I clicked yes and it did.
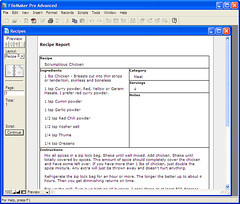
The report view is a fairly basic example of the report building tools in FileMaker. I plan to give those tools a work out in the next couple of weeks.
One thumb down here for a non-intuitive return to the edit screeen. It took me several minutes to figure out how to get back. Click on the Continue button at the left and that will return you to the edit screen.
While in the Report view, you can click the PDF icon to generate an Adobe PDF. I will touch on PDFs in future posts.
 I don't need the note field on my form so I am going to remove it. I would also like to resize the ingredients and instructions fields. I select the form view and above the layout slect list, I choose layout editor button. The layout editor button is towards the upper left of the screen.
I make my changes. To delete the notes label and box, I highlight them and select cut. I highlight the ingredients and instructions boxes (one at a time), and drag to resize. Very basic and normal Windows editing.
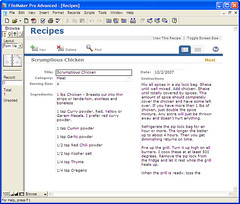 I click back on the Browse selector and view my screen.
I created a seed database, used a form to add a record, viewed a report and generated a pdf. I didn't like the default form so I removed one field and resized two others. I did this all in about 10 minutes. Awesome! It took me twice as long to write this blog entry as it did to actually do the work.
Next up, I will create an empty database and build my own form.
LewisC
filemaker review
Sunday, September 30, 2007
FileMaker Pro 9 Advanced: Installation & Requirements
I am going to refer to the software, "FileMaker Pro 9 Advanced" as "FileMaker" or "the software" for the rest of this review.
The Package
FileMaker comes boxed with a printed manual (which is a nice feature compared to other products). The siftware is contained on a single CD. Printed on the back of the CD is a 35 digit license key that must be entered, registered and activated. The software comes with a and a freebie trial CD to pass on to a friend and with a printed resource guide containing third party software solutions, consultants, certified developers, etc.
Access to the FileMaker Technet requires a paid account. The current price is US$99/year. The FileMaker site contains links to user groups, news groups and email lists. I was not able to find an actual forum on the site but that may be included with a technet membership. You can search the knowledge base for free.
System Requirements
FileMaker runs on Windows and Mac operating systems. According to FileMaker, the system requirements are:
-
Mac OS X 10.4.8
-
-
PowerPC G3, G4, G5 or Intel-based Mac
-
256 MB of RAM
-
CD-ROM drive
-
- Windows XP Professional, Home Edition (Service Pack 2)
-
- Pentium III 500MHz or higher
- 256 MB of RAM
- CD-ROM drive
- SVGA (800 x 600) or higher resolution video adapter and display
- Windows Vista Ultimate, Business, Home
-
- 800 MHz 32-bit (x86) or higher
- 512 MB of RAM
- SVGA (800x600) or higher resolution video adapter and display
- CD-ROM drive
I installed FileMaker on a Pentium 4, 3GHz laptop with 1.5GB of ram running Windows XP Pro. Before installation, I had 16.1GB free disk space and aftwards, I had 15.8 GB free disk space.
Installation
Installation was quick and painless. The setup program is the normal wizard that we have come to expect of any quality software. The wizard contained about 10 or so screens: choose your langauge, enter the user/company/license key, review the license, where should it go, etc.
The actual installation runtime on my laptop was about 10 or 15 minutes from start to finish. Once I answered the questions on the wizard, it ran undisturbed. I accepted the option to create a desktop short cut and a quick link short cut. It does give you the option to not create those.
Following the installation, you have the opportunity to register your software. You can register via email or online. I chose online and was finished in just a minute or two.
That was it for installation.
Post Installation
 There are no post installation steps that are required to be taken but, being the curious type, I decided to nose around a bit.
Unlike almost any other database software that you will install, FileMaker does not install a server service.
FileMaker does install a license manager called FlexNet. This service is started when FileMaker starts and may (or not) shut down right away. You can get additional information on this service from the FelxNet Site.
As part of the FlexNet license management, the first time you run FileMaker, you will need to go through an activation process. You can choose to activate via telephone or via the internet. I chose the internet.
The activation also went flawlessly and within about 20 minutes, I had installed the software, registered it and activated it. I was now ready to create my first database.
Saturday, September 29, 2007
Review - FileMaker Pro Advanced 9.0: Intro
I recently had the opportunity to get my hands on FileMaker Pro Advanced 9.0. I played with FileMaker waaaaay back in the DOS days but I haven't taken a look at it in a long time. Since I had this opportunity, I thought I would review the software from a holistic point of view.
This will be a multi-part review over the next couple of weeks. I'm going to take it from the basics of installation and reviewing FileMaker's support offerings all the way out to advanced topics like connecting to and querying multiple databases (Oracle, Postgres, MySQL, etc).
If there are any topics of interest for you along the way, please drop me a note and I will try to cover it.
Some historical information
FileMaker, a wholly owned subsidiary of Apple, has a long history. You can think of it somewhat as a multi-platform dBase that grew up. While dBase couldn't keep up with the changing technologies, FileMaker has thrived and grown. Currently profitable with 250 employees in 8 offices around the world, I think it can be considered a success.
Wikipedia has a very detailed history of FileMaker. In the beginning:
FileMaker began as a DOS-based product known as "Nutshell", developed by Nashoba Systems of Concord, Massachusetts around 1982 or 1983. Nutshell was distributed by Leading Edge, an electronics marketer that had recently started selling PC-compatible computers and software.
With the introduction of the Macintosh, Nashoba combined the basic data engine with a new forms-based GUI, creating a program that was dramatically easier to use. Leading Edge was not interested in the product, preferring to remain a DOS-only vendor, and kept the Nutshell name. Nashoba found another distributor, Forethought Inc., and introduced it to the Mac market as "FileMaker". When the Macintosh Plus was introduced, the next version of FileMaker was named "FileMaker Plus" to reflect the computer's name.
Forethought Inc. was purchased by Microsoft, who were then introducing a series of products that are today the core of Microsoft Office. Microsoft had their own database product, Microsoft File, so the rights to FileMaker were reverted to Nashoba. In 1988 Nashoba introduced "FileMaker 4" under its own name.
Shortly thereafter, Apple Computer formed Claris, a wholly owned subsidiary, to market software. Within months they had purchased Nashoba to round out their software suite. By that time, Leading Edge and Nutshell had faded from the marketplace because of competition from other DOS and later Windows platform database products, whereas, in spite of competition from Microsoft File, FileMaker continued to succeed on the Macintosh platform.
And from there, we have 9.0. In the next installment of this detailed review, I will cover features, system requirements and the installation process.


